
A month ago I built a new desktop computer for myself. I have been a PC enthusiast for years now. I’ve written a series of blog posts about the basics of getting into PC gaming before, and when my laptop began showing its age in terms of gaming performance, I decided to put my money where my mouth is and build my own PC all by myself without any help.
Parts and Justification
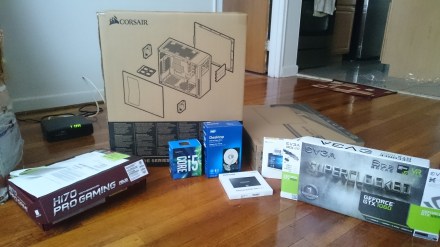
Mandatory parts display “glamour shot”.
The first and in my opinion most interesting part, is finding out all the parts you need for your system. I decided that I wanted to build a no compromise 1080p gaming system. I got all my parts at micro center, a local electronics store. They had special labor day sale pricing at the time, and also matched prices with Newegg, which was really helpful, as I was able to buy all the parts that I needed, at an optimal price, without having to wait for them to arrive via mail. Another benefit was that I was able to check whether the CPU, motherboard and RAM could POST (Power On Self Test) at the store itself, and I could be sure that I didn’t have any components that were DOA. Here are the parts that I chose:
PCPartPicker part list / Price breakdown by merchant
| Type | Item | Price |
|---|---|---|
| CPU | Intel Core i5-6500 3.2GHz Quad-Core Processor | $197.88 @ OutletPC |
| Motherboard | Asus H170 PRO GAMING ATX LGA1151 Motherboard | $117.98 @ Newegg |
| Memory | EVGA SuperSC 16GB (2 x 8GB) DDR4-2400 Memory | |
| Storage | Samsung 250GB 2.5″ Solid State Drive | $72.99 @ SuperBiiz |
| Storage | Western Digital Caviar Blue 1TB 3.5″ 7200RPM Internal Hard Drive | $49.49 @ OutletPC |
| Video Card | EVGA GeForce GTX 1060 6GB 6GB SC GAMING Video Card | $259.99 @ B&H |
| Case | Corsair 200R ATX Mid Tower Case | $44.99 @ Newegg |
| Power Supply | EVGA SuperNOVA G2 550W 80+ Gold Certified Fully-Modular ATX Power Supply | $82.98 @ Newegg |
| Operating System | Microsoft Windows 10 Home OEM 64-bit | $84.88 @ OutletPC |
| Monitor | Samsung S24D300H 24.0″ 60Hz Monitor | |
| Prices include shipping, taxes, rebates, and discounts | ||
| Total (before mail-in rebates) | $956.18 | |
| Mail-in rebates | -$45.00 | |
| Total | $911.18 | |
For my CPU, I decided to go with a non-overclockable variant of the i5. This allowed me to skip an aftermarket cooler for the build, and use the stock Intel cooler that came with the processor. I went for an H170 motherboard, as that kept costs down. A Z170 board would be overkill, as I’m not looking to overclock the system anyway. For storage I went with a 250GB SSD to store the Operating System (Windows 10 Professional) and some key programs, and a 1TB Hard Drive for the rest of my storage needs.
When it comes to gaming, the graphics card is one of the most important components which determines the overall gaming performance of your system. I had two choices for my intended 1080p goal- the Nvidia GTX 1060, or the Radeon RX 480. This was a tough decision because while the GTX 1060 beat the RX 480 in the benchmarks, the RX 480 has certain features that could lead to better gaming performance in the future. Features, like support for DX12, asynchronous compute and the Vulkan API that could lead to performance gains if developers took advantage of it. I decided to go with the former, because I’m most concerned with how the card performs in the present, and if I did choose the RX 480, the upgrade path would most probably be getting another one of those, and using them in Crossfire. Crossfire isn’t fully supported by all developers at the moment, and I’m not fully sold on that concept. I thought it would be better to go with a single card now, and swap it out for the single most powerful card I can get, in the future. Taking all of this into consideration, I went for the EVGA GTX 1060 SC edition, which is overclocked right out of the box and has 6GB of VRAM, has a small form factor, and was the most cost efficient variant of the 1060 that was available a the time.
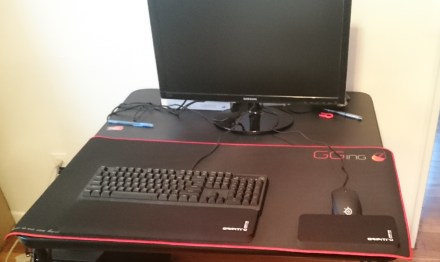
For my power supply needs I went with a 550 W unit made by EVGA. For the case, I went with the Corsair 200R. I liked the minimalist look of the case, the great build quality and the front I/O that includes two USB 3.0 ports. These two parts in particular were something that addressed a greivance that I’ve had with pre-built PCs or ones assembled by third parties. They always skimped out on the power supply and case to keep costs down, going for substandard no-name components. The power supply is a key component, and getting a cheap power supply can lead to performance issues at best, and may cause damage to your system at worst. Finally, the monitor is a 24 inch 1920X1080 resolution Samsung monitor. Other peripherals included a Kailh blue switch mechanical keyboard, a wrist pad, a Steelseries Rival 100 gaming mouse, and a large desk mat.
Assembling the PC
Once I had all the parts, it was time to put them all together. This was the part I was most apprehensive about at first. Assembling a computer seemed like it would be a difficult and time consuming task that requires a lot of specialized tools. That couldn’t have been farther from the truth. All I needed was a Phillips #2 head screwdriver, and some patience. I watched plenty of PC build video guides on YouTube to get an idea of best practices and some tips. I would recommend watching Carey Holzman’s videos, as he goes into a lot of detail and answers a lot of questions that others generally take for granted.
Once I verified that the key components did POST, I went about preparing the case. All the screws and bits required to assemble the PC were given inside the case itself, and the hard drives and SSDs didn’t need any tooling to be mounted on to the case. Mounting the drives onto the case was as simple as sliding them into the mounting points until a “click” sound was heard, that signified that they were in place. I fastened them onto the case using the provided screws just for good measure.
Installing the power supply was quite straightforward. I simply had to make sure the power supply was oriented correctly and then had to mount it on to the case.

Possibly the most time consuming task was to install the motherboard on to the case. After I had installed the CPU with its fan, and the RAM on the motherboard, I had to put the motherboard’s IO shield in to the case. As it is a friction lock and not mounted by screws, it gets tricky at times. An improperly mounted IO shield could lead to certain ports not being properly accessible. Once the IO shield is mounted, you have to make sure that the holes on the motherboard align with the mounting points and standoffs on the case. Once they line up, you also have to make sure the ports on the motherboard line up with the IO shield.
I had to reinstall the IO shield a couple of times before it fit properly, but once it was properly installed, the rest of the process went quite smoothly. After aligning the motherboard, it was just a matter of using the proper screws to mount the motherboard on to the case.

Installing the graphics card into the PCI slot was also quite simple.
Wiring and wire management is another key part of the building process. Although it is easy to route all the wires through the closest routing holes is easy, at times the easiest wire routing option was not the best one in terms of wire management. Thankfully the case provided ample routing holes to route the wires through, which helped spread out the wires rather than causing a giant mess. Wiring the case components required me to refer to the manual. Thankfully, all the wires were labeled. The wires to and from the power supply were also labeled and not reversible, so finding the right wires and the right orientation for the wires was quite simple. For the drives, the angled SATA cables were a godsend.
Installing the Operating System and Drivers
When I installed all the components and went into the UEFI/BIOS for the first time, I couldn’t find the USB drive as an option under boot devices. After messing around with all the options it was a hard restart that did the trick. Once the USB drive was detected, the Windows install went quite smoothly. I ran into another hiccup when I realized that I had to install all the drivers. I managed to use my laptop to download all the required drivers which included the drivers for the Ethernet and the graphics card, which I installed on to the PC using a flash drive.
To install the rest of the basic software, I used Ninite. It’s a great tool that lets you select the software you want, and creates a custom installer that installs all the software you want in one go. I decided to go with LibreOffice for my office suite, and Foxit Reader for reading PDFs. No flash player, no Java, no Adobe Reader.
I then tweaked my preferences for windows which included removing all the hideous app advertisements on the start menu. This video proved to be a great reference.
Final Thoughts
Building my own PC turned out to be a very fun experience, and when I was done assembling and configuring it, I was left wanting to do it all over again. I learned a lot, right from researching for parts, to troubleshooting while building the PC and installing the components. In many ways, the actual process of connecting the physical components was like building Lego- all the pieces were labeled and they fit together precisely. Some things like wire management required some thought. Thankfully, it was not too much of a hassle and the side panel didn’t require any excessive force to shut.
Building my own PC has always been a desire of mine for a long time, and I am glad I was able to put aside my apprehension and build one for myself, all by myself.

Wow, that was a great experiment, considering that the learning can be a happy n fun experience!
Wish you a exciting gaming time with your new desktop.
If I may suggest, keep a check on the time you spend gaming in your virtual world, as the real world has many more situations to offer to you, and make your life richer n worth living.
All the best !!
LikeLike
Pingback: The uniquely Indian PC Gaming Experience | ShriViews